

Four Days to Fitness
Elevate your fitness with our 4-Day Beginner Program, blending strength, endurance, and core exercises for holistic development. Tailored for beginners to establish a balanced, sustainable workout routine and long-term progress.
Welcome to the 4 Days a Week Beginner Program
Hello!
This program is a well-structured plan designed by Medifit Consultants to introduce newcomers to strength training while allowing for optimal recovery. Dividing the workout into four sessions targeting different muscle groups, this plan helps build muscle, improve endurance, and increase overall fitness.
The 4 Day Split Beginner Workout offers a balanced approach to strength training, making it ideal for newcomers to fitness. Here’s why it’s worth participating:
-
Focused Muscle Groups: Each workout day targets specific muscle groups, allowing for dedicated training and optimal recovery between sessions.
-
Steady Progression: With consistent training over four days, you’ll gradually build strength, endurance, and muscle definition without overwhelming your body.
-
Time-Efficient: Spread over four manageable days, this workout fits into busy schedules while ensuring consistent improvement.
-
Foundation for Long-Term Fitness: Learn proper exercise techniques and build a strong fitness foundation that sets you up for future, more advanced workouts.
Who Can Benefit? 4 Day Split Beginners Program will benefit are Beginners (who can go to a gym for 4 days in a week), Individuals aiming to build muscle without overtraining, Anyone wanting to learn basic lifts with a balanced workout structure.
Each session focuses on different muscle groups, ensuring you allow adequate recovery time while maximizing your workouts’ effectiveness. Join us as we embark on this fitness journey together, and remember, consistency is key!

Day 1 - Push
Day 1 - Push | Day 1 - Push | Day 1 - Push | Day 1 - Push | Day 1 - Push | Day 1 - Push | Day 1 - Push | Day 1 - Push | Day 1 - Push |


Overview:
Dumbbell Bench Press, a fundamental exercise that targets the chest, shoulders, and triceps, making it a cornerstone of any upper body workout routine. This versatile movement is suitable for all fitness levels and can be performed with various weights to match your strength and experience.
Benefits:
-
Builds Upper Body Strength: Effectively targets the pectoral muscles, deltoids, and triceps, promoting balanced strength development in the upper body.
-
Enhances Muscle Symmetry: Using dumbbells allows for a greater range of motion and helps to correct muscle imbalances by ensuring both sides of the body work equally.
-
Improves Functional Fitness: This exercise mimics everyday pushing movements, making it functional for daily activities and improving overall performance in sports and fitness.
-
Core Engagement: The stabilizing nature of the exercise engages the core, promoting improved stability and posture during other movements.
How to Perform Dumbbell Bench Press:
-
Starting Position: Begin by lying flat on a bench with a dumbbell in each hand. Your feet should be flat on the floor, and your back should be pressed firmly against the bench.
-
Grip and Alignment: Hold the dumbbells at shoulder width, with your palms facing forward and your elbows slightly bent. Your arms should form a 90-degree angle at the elbows.
-
Pressing Motion: Engage your core and press the dumbbells upward in a controlled motion until your arms are fully extended, but not locked out. Keep your shoulders retracted and avoid lifting your back off the bench.
-
Lowering the Weights: Slowly lower the dumbbells back to the starting position, maintaining control throughout the movement. Your elbows should remain at a 45-degree angle to your body.
-
Repetition: Aim for 8-12 repetitions for 2-3 sets, adjusting the weight as needed to maintain proper form.
Tips for an Dumbbell Bench Press:
-
Start with lighter weights to master your form before progressing to heavier dumbbells.
-
Maintain a neutral wrist position throughout the movement to prevent strain or injury.
-
Focus on controlled movements rather than speed to maximize the effectiveness of the exercise.

Overview:
Dumbbell Shoulder Press, a powerful and effective exercise that targets the shoulders, triceps, and upper chest. This movement is essential for building upper body strength, improving shoulder stability, and enhancing overall functional fitness. Suitable for beginners and seasoned athletes alike, the Dumbbell Shoulder Press can be easily adapted to different fitness levels.
Benefits:
-
Strengthens Shoulder Muscles: Effectively targets the deltoids, trapezius, and triceps, helping to build overall upper body strength and muscle definition.
-
Enhances Stability: Engaging the core during the exercise improves overall stability and posture, which is vital for various physical activities and daily tasks.
-
Increases Functional Fitness: This exercise mimics overhead movements often encountered in sports and everyday life, enhancing your functional strength and performance.
-
Versatile and Adaptable: Can be performed seated or standing, and the weight can be adjusted to accommodate all fitness levels, from beginners to advanced lifters.
How to Perform the Dumbbell Shoulder Press:
-
Starting Position: Begin by sitting or standing with a dumbbell in each hand. Your feet should be shoulder-width apart for a stable base. If sitting, ensure your back is straight and your feet are flat on the floor.
-
Grip and Alignment: Hold the dumbbells at shoulder height with your palms facing forward and your elbows bent at a 90-degree angle. Your wrists should be in line with your elbows.
-
Pressing Motion: Engage your core and press the dumbbells upward in a controlled motion until your arms are fully extended overhead. Ensure that your elbows do not lock out at the top of the movement.
-
Lowering the Weights: Slowly lower the dumbbells back to the starting position, maintaining control throughout. Your elbows should return to the 90-degree angle.
-
Repetition: Aim for 8-12 repetitions for 2-3 sets, adjusting the weight as needed to maintain proper form.
Tips for an Effective Dumbbell Shoulder Press:
-
Start with lighter weights to master your form and gradually increase as your strength improves.
-
Keep your movements controlled and avoid arching your back to maintain proper posture and avoid injury.
-
Focus on your breathing—exhale as you press up and inhale as you lower the weights.

Overview:
Arnold Press, a dynamic shoulder exercise that not only targets the deltoid muscles but also engages the upper chest and triceps. Named after the legendary bodybuilder Arnold Schwarzenegger, this exercise adds a unique twist to the traditional shoulder press, making it an excellent addition to your upper body workout routine.
Benefits:
-
Comprehensive Shoulder Development: This exercise effectively targets all three heads of the deltoid muscle, promoting balanced growth and strength.
-
Improved Shoulder Mobility: The rotational component enhances shoulder mobility and flexibility, reducing the risk of injuries.
-
Increased Functional Strength: The Arnold Press mimics various overhead movements encountered in daily activities and sports, improving overall functional fitness.
-
Engages Core Muscles: By performing the exercise standing, you engage your core muscles, promoting stability and balance.
How to Perform the Arnold Press:
-
Starting Position: Sit or stand with a dumbbell in each hand. Hold the dumbbells in front of you at chest height, palms facing your body, and elbows bent.
-
Grip and Alignment: Your feet should be shoulder-width apart for stability. Keep your back straight and core engaged.
-
Pressing Motion: As you press the dumbbells overhead, rotate your palms to face forward. Extend your arms fully while keeping your elbows slightly bent at the top of the movement.
-
Lowering the Weights: Slowly lower the dumbbells back to the starting position, rotating your palms to face you again as you descend.
-
Repetition: Aim for 8-12 repetitions for 2-3 sets, adjusting the weight as needed to maintain proper form.
Tips for an Effective Arnold Press:
-
Start with lighter weights to master the movement pattern before progressing to heavier dumbbells.
-
Maintain control throughout the exercise to prevent using momentum, ensuring maximum muscle engagement.
-
Focus on your breathing; exhale as you press overhead and inhale as you lower the weights.

Description:
Push-ups are a classic bodyweight exercise that engages multiple muscle groups, including the chest, shoulders, triceps, and core. They are highly effective for building upper body strength and enhancing overall muscular endurance.
Benefits:
-
Strengthens the chest, shoulders, triceps, and core.
-
Improves upper body stability and posture.
-
Enhances functional strength for daily activities.
-
Requires no equipment, making it versatile and accessible.
How to Perform:
-
Begin in a high plank position with your hands shoulder-width apart and your body forming a straight line from head to heels.
-
Engage your core to keep your hips level and aligned with your body.
-
Slowly lower your chest toward the ground by bending your elbows, keeping them at a 45-degree angle.
-
Stop just before your chest touches the floor, then push back up to the starting position by straightening your arms.
-
Maintain controlled movement throughout the exercise.
Tips:
-
Keep your neck neutral; avoid craning your head up or dropping it.
-
If full push-ups are challenging, perform knee push-ups as a progression.
-
Focus on maintaining a straight body line to avoid sagging hips or arching your back.
-
Breathe out as you push up and inhale as you lower down.

Overview:
Cable Cross Over as an essential exercise for targeting the chest muscles while also engaging the shoulders and triceps. This versatile movement is great for building muscle definition and strength, making it a staple in any upper body workout routine.
Benefits:
-
Targeted Chest Development: Isolates the pectoral muscles for enhanced growth and definition.
-
Versatile Resistance: Cable machines provide constant tension throughout the movement, making it effective for muscle activation.
-
Improves Shoulder Stability: Engages stabilizing muscles in the shoulders, promoting better overall shoulder health and function.
How to Perform Cable Cross Over:
-
Setup: Adjust the pulleys of a cable machine to a high position and stand in the center, grabbing the handles with both hands. Step forward slightly to create tension in the cables.
-
Starting Position: With a slight bend in your elbows, pull the handles down and together in front of you, keeping your core engaged and feet shoulder-width apart.
-
Cross Over Motion: Squeeze your chest as you bring the handles together at chest level, crossing them slightly for a full range of motion.
-
Controlled Release: Slowly return to the starting position while maintaining control and tension in the cables, feeling the stretch in your chest.
-
Repetitions: Aim for 10-15 reps for 3-4 sets, adjusting the weight as needed.
Tips for an Effective Cable Cross Over:
-
Keep your movements slow and controlled to maximize muscle engagement.
-
Focus on squeezing the chest muscles at the peak of the movement for better results.
-
Maintain proper posture by keeping your back straight and core tight throughout the exercise.

Overview:
Lateral Raises as an effective exercise for developing shoulder strength and enhancing upper body aesthetics. This exercise specifically targets the deltoid muscles, promoting broader shoulders and improved shoulder stability, making it a key addition to your strength training routine.
Benefits:
-
Shoulder Development: Effectively targets the lateral deltoids, helping to build width and definition in the shoulders.
-
Improves Posture: Strengthens the shoulder girdle, contributing to better posture and reducing the risk of injuries.
-
Enhanced Upper Body Strength: Aids in improving overall upper body strength, which is beneficial for various functional movements.
How to Perform Lateral Raises:
-
Starting Position: Stand tall with your feet shoulder-width apart, holding a dumbbell in each hand at your sides. Keep your elbows slightly bent and palms facing inward.
-
Raise the Dumbbells: With a controlled motion, lift the dumbbells out to the sides until your arms are parallel to the floor. Keep your wrists straight and avoid shrugging your shoulders.
-
Squeeze at the Top: Pause for a moment at the top of the movement, squeezing your shoulder muscles for maximum engagement.
-
Lower with Control: Slowly lower the dumbbells back to the starting position, maintaining control throughout the movement.
-
Repetitions: Aim for 10-15 reps for 3-4 sets, adjusting the weight as needed for your fitness level.
Tips for an Effective Lateral Raises:
-
Focus on form over weight; it’s better to use lighter weights and maintain proper technique.
-
Keep a slight bend in your elbows throughout the movement to reduce strain on the joints.
-
Engage your core for added stability and control during the exercise.

Overview:
Triceps Overhead Dumbbell Extension, an excellent exercise designed to isolate and strengthen the triceps muscles. This movement is perfect for anyone looking to enhance upper arm strength and definition while improving overall functional fitness.
Benefits:
-
Isolates Triceps Muscles: This exercise specifically targets the triceps, helping to build strength and muscle definition in the upper arms.
-
Improves Arm Stability: Engaging the triceps enhances stability and control in various upper body movements, benefiting overall performance in sports and daily activities.
-
Enhances Functional Strength: Overhead movements mimic everyday actions, contributing to better functional fitness and improving overall strength.
-
Versatile and Adjustable: Can be performed standing or seated, with various weights to accommodate different fitness levels.
How to Perform the Triceps Overhead Dumbbell Extensions:
-
Starting Position: Stand or sit with your feet shoulder-width apart. Hold a dumbbell with both hands, gripping it securely with your palms facing upward. Raise the dumbbell overhead, fully extending your arms.
-
Hand Placement: Ensure your hands are positioned under the inner plate of the dumbbell, fingers interlaced, with your elbows close to your head.
-
Lowering Motion: Inhale and slowly lower the dumbbell behind your head by bending your elbows. Keep your elbows stationary and close to your ears throughout the movement. Lower until you feel a comfortable stretch in your triceps.
-
Pressing Up: Exhale as you press the dumbbell back up to the starting position, fully extending your arms while keeping your elbows tight to your head.
-
Repetition: Aim for 10-15 repetitions for 2-3 sets, adjusting the weight as needed to maintain proper form.
Tips for an Effective Triceps Overhead Dumbbell Extensions:
-
Start with a lighter dumbbell to master your form before progressing to heavier weights.
-
Focus on maintaining a controlled motion throughout the exercise to prevent straining your shoulders.
-
Keep your core engaged to maintain stability and support your lower back.

Overview:
Triceps Rope Push Downs, an effective exercise specifically designed to target the triceps muscles. This move is perfect for anyone looking to build upper arm strength and definition, and it’s a staple in many strength training programs.
Benefits:
-
Isolates Triceps Muscles: This exercise effectively targets all three heads of the triceps, promoting balanced muscle development and strength.
-
Improves Arm Definition: Regularly incorporating push downs can help enhance the appearance of your arms by building muscle definition.
-
Enhances Joint Stability: Strengthening the triceps contributes to overall joint stability in the elbows and shoulders, which is beneficial for various upper body movements.
-
Adjustable for All Levels: The weight on the cable machine can easily be adjusted, making it suitable for beginners and advanced lifters alike.
How to Perform Triceps Rope Push Downs:
-
Starting Position: Begin by attaching a rope handle to the high pulley of a cable machine. Stand facing the machine with your feet shoulder-width apart and your knees slightly bent.
-
Grip the Rope: With both hands, grasp the rope with an overhand grip (palms facing each other) and pull it down so that your elbows are bent at about 90 degrees and your hands are close to your chest.
-
Lowering Motion: Keeping your elbows tucked in close to your body, exhale as you push the rope down towards your thighs. Fully extend your arms at the bottom of the movement, allowing your triceps to fully contract.
-
Raising the Rope: Inhale as you slowly return to the starting position, controlling the movement to avoid using momentum.
-
Repetition: Aim for 10-15 repetitions for 2-3 sets, adjusting the weight on the cable machine as needed to maintain proper form.
Tips for an Effective Triceps Rope Push Downs:
-
Focus on keeping your elbows locked in place throughout the movement to ensure maximum triceps activation.
-
Start with a moderate weight to master the form before progressing to heavier loads.
-
Maintain a controlled tempo during both the pushing down and raising phases to maximize effectiveness and minimize risk of injury.

Overview:
Knee to Chest Leg Raises, an excellent exercise for strengthening the core and improving flexibility in the hips and lower back. This movement is ideal for individuals looking to enhance their abdominal strength, mobility, and overall functional fitness.
Benefits:
-
Strengthens Core Muscles: This exercise effectively targets the abdominal muscles, helping to build a strong core that supports overall stability and balance.
-
Improves Hip Flexibility: Bringing your knees to your chest enhances flexibility in the hip joints, which can improve mobility in daily activities and other exercises.
-
Supports Lower Back Health: Engaging the core while performing this exercise can help alleviate tension in the lower back and promote better posture.
-
Accessible for All Fitness Levels: The movement can be modified to suit beginners or advanced individuals by adjusting the range of motion or incorporating resistance bands.
How to Perform Knee to Chest Leg Raises:
-
Starting Position: Lie flat on your back on an exercise mat with your legs extended straight and your arms resting at your sides.
-
Engage Your Core: Tighten your abdominal muscles to stabilize your spine throughout the movement.
-
Raise Your Legs: Slowly lift your legs towards the ceiling while keeping them straight. When your legs are at about a 90-degree angle to your torso, hold briefly.
-
Bend Your Knees: As you lower your legs, bend your knees and pull them towards your chest, bringing your knees as close as possible while keeping your lower back pressed into the mat.
-
Return to Start: Slowly extend your legs back to the starting position, keeping your core engaged to control the movement.
-
Repetition: Aim for 10-15 repetitions for 2-3 sets, adjusting as needed to maintain proper form.
Tips for an Effective Knee to Chest Leg Raises:
-
Focus on maintaining a slow and controlled motion to maximize muscle engagement and reduce the risk of injury.
-
Ensure that your lower back stays pressed against the mat throughout the exercise to protect your spine.
-
Breathe out as you bring your knees to your chest and inhale as you return to the starting position.

Overview:
Mountain Climbers, a dynamic, full-body exercise that combines cardiovascular endurance with strength training. This move is perfect for anyone looking to boost their fitness levels, enhance core stability, and improve overall agility.
Benefits:
-
Full-Body Workout: This exercise engages multiple muscle groups, including the core, shoulders, chest, and legs, providing a comprehensive workout in a short time.
-
Boosts Cardiovascular Fitness: The rapid pace elevates your heart rate, making it an excellent option for improving cardiovascular endurance and burning calories.
-
Enhances Core Strength: Maintaining a plank position while moving your legs helps strengthen your core, improving stability and overall body control.
-
Increases Agility and Coordination: The quick, alternating movement improves coordination, making it beneficial for athletic performance.
How to Perform Mountain Climbers:
-
Starting Position: Begin in a high plank position, with your hands directly under your shoulders, body in a straight line from head to heels, and feet together.
-
Engage Your Core: Tighten your abdominal muscles to maintain stability throughout the movement.
-
Initiate Movement: Quickly draw your right knee toward your chest while keeping your left leg extended.
-
Switch Legs: As you return your right foot to the starting position, simultaneously draw your left knee toward your chest.
-
Alternate: Continue to alternate legs rapidly in a controlled manner, as if you are “climbing” a mountain.
-
Duration: Perform for 20-30 seconds for beginners, gradually increasing the duration as you build endurance.
Tips for an Effective Mountain Climbers:
-
Maintain a straight line from head to heels to avoid sagging in the hips or arching in the back.
-
Focus on controlled breathing; exhale as you drive your knee in and inhale as you return to the plank position.
-
Start at a slower pace if you're new to the exercise, gradually increasing speed as you gain strength and confidence.

Overview:
10-Minute Treadmill Walk, an excellent exercise for individuals of all fitness levels looking to enhance cardiovascular health, improve endurance, and kickstart their fitness journey. This quick yet effective workout can easily fit into your daily routine, making it a perfect choice for busy schedules.
Benefits:
-
Cardiovascular Health: Walking is a low-impact way to elevate your heart rate and improve circulation, supporting overall heart health.
-
Burns Calories: A brisk 10-minute walk can help burn calories, aiding in weight management and fat loss.
-
Improves Mood: Physical activity releases endorphins, which can boost your mood and reduce stress levels.
-
Enhances Lower Body Strength: Regular walking strengthens the muscles in your legs and glutes, contributing to better overall mobility.
How to Perform the 10-Minute Treadmill Walk:
-
Set Up the Treadmill: Begin by adjusting the treadmill to a comfortable speed, typically around 3-4 mph for a moderate walk, depending on your fitness level.
-
Warm-Up: Start with a 1-minute warm-up at a slow pace to prepare your muscles and joints for the workout.
-
Walking Routine: After your warm-up, increase your pace to a brisk walk. Maintain an upright posture with your shoulders relaxed and arms at your sides or gently swinging.
-
Incorporate Incline (Optional): If you’re comfortable, increase the incline of the treadmill to add intensity and engage your leg muscles more effectively.
-
Cool Down: As you approach the end of your 10 minutes, gradually decrease the speed to return to a slower pace for the last minute to cool down.
Tips for an Effective 10-Minute Treadmill Walk:
-
Focus on maintaining a steady pace and consistent form throughout the workout.
-
Use proper footwear to provide support and reduce the risk of injury.
-
Stay hydrated before and after your walk to keep your body functioning optimally.

Day 2 - Legs
Day 2 - Legs | Day 2 - Legs | Day 2 - Legs | Day 2 - Legs | Day 2 - Legs | Day 2 - Legs | Day 2 - Legs | Day 2 - Legs |

Overview:
Barbell Squats as a cornerstone exercise for building lower body strength and enhancing overall athleticism. This compound movement primarily targets the quadriceps, hamstrings, glutes, and core, making it an essential addition to any strength training program.
Benefits:
-
Strength Development: Effectively builds strength in the lower body and core, enhancing overall functional fitness.
-
Muscle Hypertrophy: Promotes muscle growth in the quads, hamstrings, and glutes, contributing to a well-defined physique.
-
Improved Mobility: Encourages greater flexibility and range of motion in the hips and legs, aiding athletic performance.
How to Perform Barbell Squats:
-
Setup: Begin by positioning a barbell on a squat rack at shoulder height. Stand facing the bar, and step under it so that it rests across your upper back. Ensure your feet are shoulder-width apart and your core is engaged.
-
Grip and Position: Grasp the bar with both hands, slightly wider than shoulder-width, and lift it off the rack by standing up. Step back to create space for your squat.
-
Squatting Motion: Initiate the squat by bending at the hips and knees simultaneously. Keep your chest up, back straight, and weight centered over your heels. Lower your body until your thighs are at least parallel to the ground, ensuring your knees track over your toes.
-
Return to Start: Push through your heels to rise back to the starting position, fully extending your legs while maintaining good posture throughout the movement.
-
Repetitions: Aim for 8-12 reps for 3-4 sets, adjusting the weight to suit your fitness level.
Tips for an Effective Barbell Squats:
-
Maintain proper form by keeping your knees aligned with your toes and avoiding excessive forward lean.
-
Use a spotter or squat rack when lifting heavy to ensure safety and proper technique.
-
Incorporate variations, such as front squats or sumo squats, to target different muscle groups and keep your workouts dynamic.

Overview:
Bulgarian Split Squats for those looking to enhance lower body strength and stability. This unilateral exercise targets the quadriceps, hamstrings, and glutes while also improving balance and coordination, making it an excellent addition to any workout routine.
Benefits:
-
Strength and Stability: This exercise effectively builds strength in the lower body while promoting stability and balance, particularly in the hips and core.
-
Muscle Imbalance Correction: By working each leg independently, Bulgarian Split Squats help identify and correct muscular imbalances between legs.
-
Enhanced Flexibility: The movement encourages greater flexibility in the hip flexors and quadriceps, which can improve overall athletic performance.
How to Perform Bulgarian Split Squats:
-
Setup: Start by standing a few feet in front of a bench or a sturdy platform. Place one foot on the bench behind you, ensuring that your toes are pointed down and your foot is secure.
-
Starting Position: Stand tall with your feet hip-width apart and engage your core. Your front leg should be positioned far enough forward that when you lower into the squat, your knee stays directly above your ankle.
-
Squatting Motion: Lower your body by bending your front knee, ensuring that your back knee approaches the ground while maintaining a straight torso. Go down until your front thigh is parallel to the ground or lower if flexibility allows.
-
Return to Start: Push through your front heel to rise back to the starting position, fully extending your knee and hip.
-
Repetitions: Aim for 8-12 reps on each leg for 3-4 sets, adjusting the weight (e.g., holding dumbbells) to suit your fitness level.
Tips for an Effective Bulgarian Split Squats:
-
Focus on keeping your chest lifted and your core engaged throughout the movement to maintain proper form.
-
Ensure your front knee does not extend beyond your toes during the squat to prevent unnecessary strain.
-
Use a mirror or ask a partner for feedback on your form, especially when first learning the movement.

Overview:
Step Ups to your workout routine for a functional lower-body exercise that improves strength, balance, and coordination. Step ups target the quads, hamstrings, glutes, and core, making them perfect for building leg strength and endurance.
Benefits:
-
Builds Lower Body Strength: Targets the quads, glutes, and hamstrings, making it effective for toning and strengthening the legs.
-
Improves Balance and Coordination: The unilateral nature of step ups helps improve balance and coordination, reducing muscle imbalances.
-
Functional Movement: Mimics real-life activities like climbing stairs, enhancing functional strength for daily tasks.
How to Perform Step Ups:
-
Equipment Setup: Use a sturdy bench, box, or step at knee height. Hold dumbbells for added resistance or perform the exercise with body weight for beginners.
-
Step Up Motion: Stand tall, engage your core, and step onto the platform with your right foot. Press through your heel to lift your body up, bringing your left foot up to meet your right.
-
Step Down: Slowly step down with your left foot, followed by your right, maintaining control and balance throughout the movement.
-
Repetition: Perform 10-12 reps per leg for 3-4 sets, alternating between legs.
Tips for an Effective Step Ups:
-
Keep your chest up and avoid leaning forward as you step up.
-
Drive through your heel on the stepping leg to fully engage the glutes.
-
Use a controlled tempo to maximize muscle activation and avoid injury.
Overview:
Leg Curls in your workout routine for an effective way to isolate and strengthen the hamstrings. This exercise plays a crucial role in improving leg strength, enhancing athletic performance, and preventing injury.
Benefits:
-
Isolates the Hamstrings: Leg curls specifically target the hamstring muscles, which are essential for powerful lower body movements.
-
Enhances Athletic Performance: Strong hamstrings improve running speed, jumping power, and overall leg strength for athletic activities.
-
Reduces Risk of Injury: Strengthening the hamstrings helps prevent knee and lower body injuries by balancing strength between the front and back of the legs.
How to Perform Leg Curls:
-
Machine Setup: Adjust the leg curl machine so the padded bar rests just above your ankles when you're seated or lying face down, depending on the machine type.
-
Curling Motion: Engage your core, keep your back flat against the seat, and flex your knees to curl the padded bar toward your glutes. Focus on contracting your hamstrings.
-
Controlled Lowering: Slowly extend your legs back to the starting position in a controlled manner, maintaining tension in your hamstrings throughout the movement.
-
Repetitions: Perform 10-15 reps for 3-4 sets, adjusting the weight for challenge and control.
Tips for an Effective Leg Curls:
-
Avoid arching your back; keep it firmly pressed against the bench for proper form.
-
Control the weight throughout the entire range of motion to maximize muscle engagement.
-
Focus on slow, deliberate movements to ensure proper activation of the hamstrings.

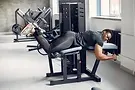
Overview:
Leg Extensions into your workout routine to isolate and strengthen the quadriceps. This exercise is highly effective for developing muscle tone, improving knee joint stability, and enhancing overall leg strength.
Benefits:
-
Isolates Quadriceps: Targets the quadriceps directly, helping to build muscle definition and strength in the front of the thighs.
-
Supports Knee Health: Strengthening the quads helps stabilize the knee joint, reducing the risk of knee injuries.
-
Enhances Athletic Performance: Strong quads improve overall leg power, benefiting sports performance and daily activities like walking or climbing stairs.
How to Perform Leg Extensions:
-
Machine Setup: Adjust the seat of the leg extension machine so your knees align with the machine's pivot point. Place your feet under the padded bar just above your ankles.
-
Extension Motion: Engage your core and extend your legs upward by straightening your knees, squeezing your quadriceps at the top of the movement.
-
Controlled Lowering: Slowly lower your legs back to the starting position, keeping tension in your quads throughout the entire movement.
-
Repetitions: Perform 10-12 reps for 3-4 sets, adjusting the weight as needed for a challenging but controlled movement.
Tips for an Effective Leg Extensions:
-
Avoid locking your knees at the top of the movement to protect the joints.
-
Use a slow, controlled motion to maximize muscle engagement and minimize injury risk.
-
Keep your back pressed against the seat and avoid using momentum to lift the weight.

Overview:
Plank into your workout routine to build core strength, stability, and endurance. This foundational exercise engages not just your abs but also your shoulders, back, glutes, and legs, making it a powerful full-body workout.
Benefits:
-
Strengthens the Core: Targets the abdominals, obliques, and lower back, essential for a strong and stable core.
-
Improves Posture: Engages the muscles that support your spine, helping to enhance posture and reduce back pain.
-
Enhances Stability and Balance: The plank challenges multiple muscle groups, improving your balance and overall body control.
How to Perform a Plank:
-
Starting Position: Begin by lying face down, then lift your body up onto your forearms and toes, creating a straight line from your head to your heels. Ensure your elbows are directly beneath your shoulders.
-
Hold the Position: Engage your core, glutes, and legs while keeping your body in a straight line. Avoid letting your hips sag or raise too high.
-
Duration: Hold the plank for 20-60 seconds, depending on your fitness level. Repeat for 3-4 sets.
Tips for an Effective Plank:
-
Avoid locking your knees at the top of the movement to protect the joints.
-
Use a slow, controlled motion to maximize muscle engagement and minimize injury risk.
-
Keep your back pressed against the seat and avoid using momentum to lift the weight.
Incorporate the Plank:
Adding Planks to your routine will enhance core strength and stability, improving your performance in both everyday activities and fitness. For customized workout plans, connect with Medifit Consultants for expert guidance.
Overview:
Knee to Chest Leg Raises, an excellent exercise for strengthening the core and improving flexibility in the hips and lower back. This movement is ideal for individuals looking to enhance their abdominal strength, mobility, and overall functional fitness.
Benefits:
-
Strengthens Core Muscles: This exercise effectively targets the abdominal muscles, helping to build a strong core that supports overall stability and balance.
-
Improves Hip Flexibility: Bringing your knees to your chest enhances flexibility in the hip joints, which can improve mobility in daily activities and other exercises.
-
Supports Lower Back Health: Engaging the core while performing this exercise can help alleviate tension in the lower back and promote better posture.
-
Accessible for All Fitness Levels: The movement can be modified to suit beginners or advanced individuals by adjusting the range of motion or incorporating resistance bands.
How to Perform Knee to Chest Leg Raises:
-
Starting Position: Lie flat on your back on an exercise mat with your legs extended straight and your arms resting at your sides.
-
Engage Your Core: Tighten your abdominal muscles to stabilize your spine throughout the movement.
-
Raise Your Legs: Slowly lift your legs towards the ceiling while keeping them straight. When your legs are at about a 90-degree angle to your torso, hold briefly.
-
Bend Your Knees: As you lower your legs, bend your knees and pull them towards your chest, bringing your knees as close as possible while keeping your lower back pressed into the mat.
-
Return to Start: Slowly extend your legs back to the starting position, keeping your core engaged to control the movement.
-
Repetition: Aim for 10-15 repetitions for 2-3 sets, adjusting as needed to maintain proper form.
Tips for an Effective Knee to Chest Leg Raises:
-
Focus on maintaining a slow and controlled motion to maximize muscle engagement and reduce the risk of injury.
-
Ensure that your lower back stays pressed against the mat throughout the exercise to protect your spine.
-
Breathe out as you bring your knees to your chest and inhale as you return to the starting position.
Overview:
Mountain Climbers, a dynamic, full-body exercise that combines cardiovascular endurance with strength training. This move is perfect for anyone looking to boost their fitness levels, enhance core stability, and improve overall agility.
Benefits:
-
Full-Body Workout: This exercise engages multiple muscle groups, including the core, shoulders, chest, and legs, providing a comprehensive workout in a short time.
-
Boosts Cardiovascular Fitness: The rapid pace elevates your heart rate, making it an excellent option for improving cardiovascular endurance and burning calories.
-
Enhances Core Strength: Maintaining a plank position while moving your legs helps strengthen your core, improving stability and overall body control.
-
Increases Agility and Coordination: The quick, alternating movement improves coordination, making it beneficial for athletic performance.
How to Perform Mountain Climbers:
-
Starting Position: Begin in a high plank position, with your hands directly under your shoulders, body in a straight line from head to heels, and feet together.
-
Engage Your Core: Tighten your abdominal muscles to maintain stability throughout the movement.
-
Initiate Movement: Quickly draw your right knee toward your chest while keeping your left leg extended.
-
Switch Legs: As you return your right foot to the starting position, simultaneously draw your left knee toward your chest.
-
Alternate: Continue to alternate legs rapidly in a controlled manner, as if you are “climbing” a mountain.
-
Duration: Perform for 20-30 seconds for beginners, gradually increasing the duration as you build endurance.
Tips for an Effective Mountain Climbers:
-
Maintain a straight line from head to heels to avoid sagging in the hips or arching in the back.
-
Focus on controlled breathing; exhale as you drive your knee in and inhale as you return to the plank position.
-
Start at a slower pace if you're new to the exercise, gradually increasing speed as you gain strength and confidence.
Overview:
10-Minute Treadmill Walk, an excellent exercise for individuals of all fitness levels looking to enhance cardiovascular health, improve endurance, and kickstart their fitness journey. This quick yet effective workout can easily fit into your daily routine, making it a perfect choice for busy schedules.
Benefits:
-
Cardiovascular Health: Walking is a low-impact way to elevate your heart rate and improve circulation, supporting overall heart health.
-
Burns Calories: A brisk 10-minute walk can help burn calories, aiding in weight management and fat loss.
-
Improves Mood: Physical activity releases endorphins, which can boost your mood and reduce stress levels.
-
Enhances Lower Body Strength: Regular walking strengthens the muscles in your legs and glutes, contributing to better overall mobility.
How to Perform the 10-Minute Treadmill Walk:
-
Set Up the Treadmill: Begin by adjusting the treadmill to a comfortable speed, typically around 3-4 mph for a moderate walk, depending on your fitness level.
-
Warm-Up: Start with a 1-minute warm-up at a slow pace to prepare your muscles and joints for the workout.
-
Walking Routine: After your warm-up, increase your pace to a brisk walk. Maintain an upright posture with your shoulders relaxed and arms at your sides or gently swinging.
-
Incorporate Incline (Optional): If you’re comfortable, increase the incline of the treadmill to add intensity and engage your leg muscles more effectively.
-
Cool Down: As you approach the end of your 10 minutes, gradually decrease the speed to return to a slower pace for the last minute to cool down.
Tips for an Effective 10-Minute Treadmill Walk:
-
Focus on maintaining a steady pace and consistent form throughout the workout.
-
Use proper footwear to provide support and reduce the risk of injury.
-
Stay hydrated before and after your walk to keep your body functioning optimally.
Day 3 - Pull
Day 3 - Pull | Day 3 - Pull | Day 3 - Pull | Day 3 - Pull | Day 3 - Pull | Day 3 - Pull | Day 3 - Pull | Day 3 - Pull | Day 3 - Pull | Day 3 - Pull |

Overview:
Lat Pull Down, a fundamental exercise designed to strengthen the latissimus dorsi, the large muscles of the back. This movement is essential for improving upper body strength, enhancing posture, and building a strong V-taper shape.
Benefits:
-
Strengthens the Back: This exercise effectively targets the lats and upper back muscles, helping to develop strength and muscle definition.
-
Improves Posture: Strengthening the back muscles contributes to better posture, reducing the risk of slouching or back pain.
-
Enhances Functional Fitness: The lat pull down mimics pulling movements in everyday activities, improving overall functional strength.
-
Versatile for All Fitness Levels: The machine allows for weight adjustments, making it accessible for beginners and advanced lifters alike.
How to Perform Lat Pull Down:
-
Set Up the Machine: Begin by adjusting the seat height on the lat pull-down machine so that your knees are securely placed under the thigh pad. Select an appropriate weight for your fitness level.
-
Grip the Bar: Reach up to grasp the bar with a wide grip, palms facing away from you (overhand grip). Your hands should be slightly wider than shoulder-width apart.
-
Engage Your Core: Sit upright with your chest lifted and shoulders relaxed. Engage your core to maintain stability throughout the movement.
-
Pull the Bar Down: Exhale as you pull the bar down towards your upper chest, squeezing your shoulder blades together. Keep your elbows pointed down and back, ensuring that your wrists remain neutral.
-
Control the Release: Inhale as you slowly raise the bar back to the starting position, maintaining control and avoiding jerking movements.
-
Repetition: Aim for 8-12 repetitions for 2-4 sets, adjusting the weight as needed to maintain proper form.
Tips for an Effective Lat Pull Down:
-
Focus on slow and controlled movements to maximize muscle engagement and avoid injury.
-
Ensure that your upper body remains stationary during the pull-down; avoid using momentum.
-
Breathing is crucial: exhale while pulling the bar down and inhale as you release.

Overview:
V Grip Cable Row in developing a strong back and improving overall upper body strength. This exercise targets the latissimus dorsi, rhomboids, and traps, contributing to better posture and enhanced muscular definition.
Benefits:
-
Targeted Back Development: Specifically engages multiple back muscles, leading to improved strength and muscular balance.
-
Postural Improvement: Strengthening the back helps counteract the effects of poor posture from prolonged sitting or computer use.
-
Functional Strength: Enhances overall upper body strength, benefiting activities that involve pulling or lifting.
How to Perform V Grip Cable Row:
-
Setup: Attach a V-grip handle to a low pulley on a cable machine. Sit at the machine with your feet planted firmly on the platform, and grasp the V-grip handle with both hands, palms facing each other.
-
Starting Position: Sit up straight, engage your core, and pull the handle towards your abdomen, keeping your elbows close to your body.
-
Rowing Motion: As you pull the handle towards you, squeeze your shoulder blades together and engage your back muscles. Ensure your chest stays up and your back remains straight throughout the movement.
-
Controlled Return: Slowly extend your arms back to the starting position, maintaining control and tension in the cables.
-
Repetitions: Aim for 10-15 reps for 3-4 sets, adjusting the weight to match your fitness level.
Tips for an Effective V Grip Cable Row:
-
Focus on squeezing your shoulder blades together at the peak of the movement for maximum engagement.
-
Maintain a neutral spine throughout the exercise to avoid strain on your lower back.
-
Control the speed of both the pulling and returning phases to maximize muscle activation.

Overview:
Single Arm Row, a powerful exercise designed to build strength in the back, shoulders, and arms while promoting core stability. This movement is perfect for anyone looking to enhance their upper body strength and improve muscular balance.
Benefits:
-
Strengthens the Back: This exercise effectively targets the latissimus dorsi, rhomboids, and trapezius muscles, promoting overall back strength and development.
-
Enhances Core Stability: The unilateral nature of this movement requires core engagement to maintain balance, improving overall core strength.
-
Improves Muscular Balance: Working one arm at a time helps identify and correct muscle imbalances, promoting symmetry in muscle development.
-
Versatile and Accessible: The single arm row can be performed with dumbbells, kettlebells, or resistance bands, making it suitable for various fitness levels and settings.
How to Perform Single Arm Row:
-
Equipment Setup: Begin by selecting a dumbbell that suits your fitness level. Stand next to a bench and place one knee and hand on the bench for support, creating a stable base.
-
Starting Position: With your other foot firmly on the ground, hold the dumbbell in the opposite hand, allowing it to hang straight down from your shoulder. Your back should be flat and parallel to the ground.
-
Engage Your Core: Brace your core to maintain stability throughout the exercise. Keep your head in a neutral position.
-
Row the Weight: Exhale as you pull the dumbbell towards your hip, bending your elbow and squeezing your shoulder blade towards your spine. Focus on using your back muscles rather than your arm to initiate the movement.
-
Control the Release: Inhale as you slowly lower the dumbbell back to the starting position, maintaining control throughout the movement.
-
Repetition: Perform 8-12 repetitions for each arm, completing 2-4 sets based on your fitness level.
Tips for an Effective Single Arm Row:
-
Focus on maintaining a flat back throughout the exercise; avoid rounding your shoulders.
-
Keep your movements controlled to maximize muscle engagement and reduce the risk of injury.
-
Breathing is key: exhale as you pull the weight up and inhale as you lower it back down.

Overview:
Rear Delt Flyes, an effective exercise focused on strengthening the rear deltoids and upper back muscles. This movement is essential for improving shoulder stability, posture, and overall upper body aesthetics.
Benefits:
-
Strengthens Rear Deltoids: This exercise specifically targets the rear delts, promoting balanced shoulder development and reducing the risk of injuries.
-
Improves Posture: Strengthening the upper back and shoulder muscles helps counteract slouching and improves overall posture.
-
Enhances Shoulder Stability: Regularly performing rear delt flyes contributes to better shoulder stability, which is essential for various upper body movements.
-
Aesthetic Appeal: Building the rear deltoids helps create a fuller appearance in the shoulders, contributing to a more aesthetically pleasing physique.
How to Perform Rear Delt Flyes:
-
Equipment Setup: Begin by selecting a pair of light to moderate dumbbells. Stand with your feet shoulder-width apart, or sit on the edge of a bench with your feet flat on the ground.
-
Starting Position: Hinge forward at the hips, keeping your back straight and chest up. Hold a dumbbell in each hand with your palms facing each other, allowing the weights to hang directly below your shoulders.
-
Engage Your Core: Brace your core to maintain stability throughout the movement and prevent rounding of the back.
-
Perform the Fly: Exhale as you raise your arms out to the sides in a wide arc, keeping a slight bend in your elbows. Focus on squeezing your shoulder blades together at the top of the movement.
-
Control the Release: Inhale as you slowly lower the dumbbells back to the starting position, maintaining control and avoiding swinging motions.
-
Repetition: Aim for 10-15 repetitions for 2-4 sets, adjusting the weight as necessary to maintain proper form.
Tips for an Effective Rear Delt Flyes:
-
Maintain a neutral spine throughout the exercise; avoid arching your back.
-
Focus on controlled movements rather than lifting heavy weights to maximize muscle engagement and minimize injury risk.
-
Breathe steadily: exhale while lifting and inhale while lowering the weights.

Overview:
Shrugs, a fundamental exercise designed to strengthen the trapezius muscles, which are key for proper posture and shoulder stability. This exercise is great for anyone looking to build upper body strength and improve overall shoulder function.
Benefits:
-
Strengthens Trapezius Muscles: This exercise effectively targets the upper traps, contributing to a stronger upper back and neck.
-
Improves Posture: Regularly incorporating shrugs into your routine helps counteract poor posture, particularly for those who sit for extended periods.
-
Enhances Shoulder Stability: Strengthening the traps supports shoulder stability, reducing the risk of injuries during other exercises or daily activities.
-
Easy to Modify: Shrugs can be performed with various weights and equipment, making them suitable for all fitness levels.
How to Perform Shrugs:
-
Equipment Setup: Begin by selecting a pair of dumbbells or a barbell that suits your fitness level. Stand with your feet shoulder-width apart and hold the weights at your sides or in front of your thighs.
-
Starting Position: Stand tall with your chest up and shoulders back, engaging your core to maintain stability throughout the movement.
-
Execute the Shrug: Exhale as you lift your shoulders straight up towards your ears, squeezing your traps at the top of the movement. Keep your arms straight and avoid bending your elbows.
-
Control the Release: Inhale as you lower your shoulders back down to the starting position, maintaining control and avoiding any jerking motions.
-
Repetition: Aim for 10-15 repetitions for 2-4 sets, adjusting the weight as necessary to maintain proper form.
Tips for an Effective Shrugs:
-
Maintain a neutral spine throughout the exercise; avoid leaning forward or backward.
-
Focus on controlled movements rather than lifting excessively heavy weights to maximize muscle engagement and minimize injury risk.
-
Breathe steadily: exhale while lifting and inhale while lowering your shoulders.

Overview:
Biceps Dumbbell Curls, one of the most effective and well-known exercises for building arm strength and size. This exercise targets the biceps, enhancing muscle definition and overall upper arm development. It’s ideal for beginners and advanced lifters alike.
Benefits:
-
Targets the Biceps: This exercise is highly effective for isolating and strengthening the biceps, promoting muscle growth and definition.
-
Improves Arm Strength: Regularly performing curls enhances arm strength, which benefits functional movements and other upper-body exercises.
-
Promotes Symmetry: Using dumbbells allows each arm to work independently, helping to correct muscle imbalances and build symmetrical strength.
-
Versatile and Accessible: Biceps curls can be done with dumbbells, resistance bands, or cables, making it adaptable to any fitness level or workout setting.
How to Perform Biceps Dumbbell Curls:
-
Equipment Setup: Grab a pair of dumbbells with a weight that suits your strength level. Stand with your feet shoulder-width apart and arms fully extended by your sides, palms facing forward.
-
Starting Position: Keep your chest up, shoulders back, and core engaged to stabilize your body.
-
Perform the Curl: Exhale as you curl both dumbbells upwards by bending at the elbows, keeping your upper arms stationary. Focus on squeezing your biceps at the top of the movement.
-
Control the Release: Inhale as you slowly lower the dumbbells back to the starting position, maintaining control and tension in the biceps.
-
Repetition: Aim for 10-15 repetitions for 2-4 sets, adjusting the weight to maintain proper form.
Tips for an Effective Biceps Dumbbell Curls:
-
Avoid swinging your body or using momentum; focus on controlled, deliberate movements to maximize biceps engagement.
-
Keep your elbows close to your torso throughout the exercise to ensure proper form.
-
Exhale as you lift the weights and inhale as you lower them.
Incorporate the Biceps Dumbbell Curls:
Add Biceps Dumbbell Curls to your workout routine for stronger, more defined arms. For more personalized workout plans and expert advice, stay connected with Medifit Consultants!
Overview:
Hammer Curls as a key exercise to build both the biceps and brachialis muscles, which lie beneath the biceps. This movement not only strengthens the arms but also improves grip strength and forearm development, making it an excellent addition to any upper body workout plan.
Benefits:
-
Targets Biceps and Brachialis: This exercise engages both the biceps and brachialis, helping you build fuller and stronger arms.
-
Improves Grip Strength: Hammer curls strengthen the forearms and improve grip, which is essential for many other exercises and daily activities.
-
Enhances Arm Definition: By working on multiple muscles in the arms, hammer curls help in achieving better muscle definition and balanced development.
-
Reduces Muscle Imbalances: The neutral grip used in this exercise promotes equal engagement in both arms, reducing the risk of strength imbalances.
How to Perform Hammer Curls:
-
Equipment Setup: Start by selecting a pair of dumbbells that suit your fitness level. Stand tall with your feet shoulder-width apart and your arms extended at your sides, palms facing inward (neutral grip).
-
Starting Position: Keep your chest up, shoulders back, and core engaged for stability.
-
Perform the Curl: Exhale as you curl the dumbbells upward, bending at the elbows while keeping them close to your torso. The palms should remain facing each other throughout the movement.
-
Control the Release: Inhale as you slowly lower the dumbbells back to the starting position, ensuring controlled movement and muscle tension.
-
Repetition: Aim for 10-15 repetitions for 2-4 sets, adjusting the weight as needed to maintain proper form.
Tips for an Effective Hammer Curls:
-
Avoid using momentum to lift the weights; focus on controlled, steady movements for maximum muscle activation.
-
Keep your wrists neutral throughout the exercise to prevent unnecessary strain.
-
Breathe steadily, exhaling as you lift the dumbbells and inhaling as you lower them.
Overview:
10-Minute Treadmill Walk, an excellent exercise for individuals of all fitness levels looking to enhance cardiovascular health, improve endurance, and kickstart their fitness journey. This quick yet effective workout can easily fit into your daily routine, making it a perfect choice for busy schedules.
Benefits:
-
Cardiovascular Health: Walking is a low-impact way to elevate your heart rate and improve circulation, supporting overall heart health.
-
Burns Calories: A brisk 10-minute walk can help burn calories, aiding in weight management and fat loss.
-
Improves Mood: Physical activity releases endorphins, which can boost your mood and reduce stress levels.
-
Enhances Lower Body Strength: Regular walking strengthens the muscles in your legs and glutes, contributing to better overall mobility.
How to Perform the 10-Minute Treadmill Walk:
-
Set Up the Treadmill: Begin by adjusting the treadmill to a comfortable speed, typically around 3-4 mph for a moderate walk, depending on your fitness level.
-
Warm-Up: Start with a 1-minute warm-up at a slow pace to prepare your muscles and joints for the workout.
-
Walking Routine: After your warm-up, increase your pace to a brisk walk. Maintain an upright posture with your shoulders relaxed and arms at your sides or gently swinging.
-
Incorporate Incline (Optional): If you’re comfortable, increase the incline of the treadmill to add intensity and engage your leg muscles more effectively.
-
Cool Down: As you approach the end of your 10 minutes, gradually decrease the speed to return to a slower pace for the last minute to cool down.
Tips for an Effective 10-Minute Treadmill Walk:
-
Focus on maintaining a steady pace and consistent form throughout the workout.
-
Use proper footwear to provide support and reduce the risk of injury.
-
Stay hydrated before and after your walk to keep your body functioning optimally.
Day 4 - Full Body & Core
Day 4 - Full Body & Core | Day 4 - Full Body & Core | Day 4 - Full Body & Core | Day 4 - Full Body & Core | Day 4 - Full Body & Core |

Overview:
Deadlift as a cornerstone exercise for building overall strength and improving functional fitness. This compound movement primarily targets the posterior chain, engaging the glutes, hamstrings, lower back, and core, making it essential for anyone looking to enhance their strength and athletic performance.
Benefits:
-
Full-Body Strength: The deadlift engages multiple muscle groups, making it one of the most effective exercises for building total body strength.
-
Core Stability: This movement requires significant core activation, promoting better stability and balance in everyday activities and other exercises.
-
Functional Fitness: Deadlifts mimic real-life movements, improving your ability to lift heavy objects safely and efficiently.
How to Perform a Deadlift:
-
Setup: Stand with your feet hip-width apart, positioning the barbell over the midfoot. Your shins should be close to the bar, and your grip should be just outside your knees.
-
Starting Position: Bend at your hips and knees to lower your body, keeping your back straight and chest lifted. Grip the barbell with both hands (either overhand or mixed grip).
-
Lifting Motion: Push through your heels and engage your glutes and hamstrings as you lift the barbell. Extend your hips and knees simultaneously, keeping the bar close to your body.
-
Finishing Position: Stand tall with your shoulders back and chest out, fully extending your hips at the top.
-
Lowering the Bar: Reverse the motion by hinging at your hips and bending your knees, lowering the bar back to the floor in a controlled manner.
-
Repetitions: Aim for 5 sets of 5 reps, ensuring proper form is maintained throughout.
Tips for an Effective Deadlift:
-
Maintain a neutral spine throughout the movement to prevent injury.
-
Focus on driving through your heels and engaging your glutes at the top of the lift.
-
Start with lighter weights to master your form before progressing to heavier loads.

Overview:
Leg March exercise, a dynamic movement that effectively combines strength training with coordination. This exercise is ideal for those looking to enhance their lower body strength, improve balance, and engage their core.
Benefits:
-
Lower Body Strength: The Leg March primarily targets the quadriceps, hamstrings, and glutes, promoting overall leg strength and endurance.
-
Core Activation: This exercise engages your core muscles as you stabilize your body during the movement, enhancing balance and coordination.
-
Functional Movement: Leg March mimics natural walking movements, making it an excellent choice for improving everyday activities and athletic performance.
-
Versatility: By adjusting the weights of the dumbbells or kettlebells, you can easily tailor the exercise to your fitness level.
How to Perform the Leg March:
-
Starting Position: Begin by standing upright with your feet hip-width apart. Hold a dumbbell or kettlebell in each hand, letting them rest at your sides.
-
Engage Your Core: Keep your chest lifted and your core engaged throughout the movement.
-
Marching Movement: Lift your right knee toward your chest while simultaneously pressing your left arm overhead, holding the dumbbell or kettlebell.
-
Alternate Legs: Lower your right leg back to the starting position and repeat the movement with your left knee and right arm. Continue alternating sides in a marching rhythm.
-
Repetitions: Aim for 3-4 sets of 10-15 repetitions on each side, depending on your fitness level.
Tips for an Effective Leg March:
-
Maintain a straight posture with your shoulders back and down, avoiding any hunching.
-
Focus on controlled movements, ensuring that your knee lifts high while maintaining balance.
-
Keep breathing steadily, inhaling as you lower your leg and exhaling during the lift.
Description:
Push-ups are a classic bodyweight exercise that engages multiple muscle groups, including the chest, shoulders, triceps, and core. They are highly effective for building upper body strength and enhancing overall muscular endurance.
Benefits:
-
Strengthens the chest, shoulders, triceps, and core.
-
Improves upper body stability and posture.
-
Enhances functional strength for daily activities.
-
Requires no equipment, making it versatile and accessible.
How to Perform:
-
Begin in a high plank position with your hands shoulder-width apart and your body forming a straight line from head to heels.
-
Engage your core to keep your hips level and aligned with your body.
-
Slowly lower your chest toward the ground by bending your elbows, keeping them at a 45-degree angle.
-
Stop just before your chest touches the floor, then push back up to the starting position by straightening your arms.
-
Maintain controlled movement throughout the exercise.
Tips:
-
Keep your neck neutral; avoid craning your head up or dropping it.
-
If full push-ups are challenging, perform knee push-ups as a progression.
-
Focus on maintaining a straight body line to avoid sagging hips or arching your back.
-
Breathe out as you push up and inhale as you lower down.
Overview:
10-Minute Treadmill Walk, an excellent exercise for individuals of all fitness levels looking to enhance cardiovascular health, improve endurance, and kickstart their fitness journey. This quick yet effective workout can easily fit into your daily routine, making it a perfect choice for busy schedules.
Benefits:
-
Cardiovascular Health: Walking is a low-impact way to elevate your heart rate and improve circulation, supporting overall heart health.
-
Burns Calories: A brisk 10-minute walk can help burn calories, aiding in weight management and fat loss.
-
Improves Mood: Physical activity releases endorphins, which can boost your mood and reduce stress levels.
-
Enhances Lower Body Strength: Regular walking strengthens the muscles in your legs and glutes, contributing to better overall mobility.
How to Perform the 10-Minute Treadmill Walk:
-
Set Up the Treadmill: Begin by adjusting the treadmill to a comfortable speed, typically around 3-4 mph for a moderate walk, depending on your fitness level.
-
Warm-Up: Start with a 1-minute warm-up at a slow pace to prepare your muscles and joints for the workout.
-
Walking Routine: After your warm-up, increase your pace to a brisk walk. Maintain an upright posture with your shoulders relaxed and arms at your sides or gently swinging.
-
Incorporate Incline (Optional): If you’re comfortable, increase the incline of the treadmill to add intensity and engage your leg muscles more effectively.
-
Cool Down: As you approach the end of your 10 minutes, gradually decrease the speed to return to a slower pace for the last minute to cool down.
Tips for an Effective 10-Minute Treadmill Walk:
-
Focus on maintaining a steady pace and consistent form throughout the workout.
-
Use proper footwear to provide support and reduce the risk of injury.
-
Stay hydrated before and after your walk to keep your body functioning optimally.


Overview:
Knee to Chest on Bench exercise, a powerful movement that effectively targets your core and hip flexors while improving overall flexibility and stability. This exercise is suitable for all fitness levels and can be easily incorporated into any workout routine.
Benefits:
-
Core Strengthening: This exercise engages the abdominal muscles, helping to strengthen the core and improve overall stability.
-
Hip Flexor Stretch: The Knee to Chest movement stretches the hip flexors, which can become tight from prolonged sitting and inactivity.
-
Lower Back Relief: By gently pulling your knees to your chest, you can alleviate tension in the lower back and enhance flexibility in the lumbar region.
-
Improved Posture: Strengthening the core and stretching the hip flexors contributes to better posture and alignment during daily activities.
How to Perform the Knee to Chest on Bench:
-
Starting Position: Begin by sitting on the edge of a flat bench with your feet flat on the floor and shoulder-width apart. Ensure that your back is straight and your core is engaged.
-
Knee Lift: Slowly raise your right knee towards your chest, using your hands to gently pull your knee closer if needed. Keep your left foot firmly planted on the ground for stability.
-
Hold the Position: Maintain this position for a few seconds, feeling the stretch in your lower back and hip flexors.
-
Return to Starting Position: Gradually lower your right leg back to the starting position and repeat the movement with your left knee.
-
Repetitions: Aim for 3-4 sets of 10-15 repetitions on each leg, depending on your comfort and fitness level.
Tips for an Effective Knee to Chest on Bench:
-
Keep your movements controlled and deliberate, focusing on form rather than speed.
-
Ensure that your back remains straight throughout the exercise to avoid unnecessary strain.
-
Breathe deeply and steadily, inhaling as you lower your leg and exhaling during the lift.

Overview:
Cross Trainer, an excellent piece of equipment designed to enhance cardiovascular fitness and build overall body strength. The cross trainer, also known as an elliptical trainer, provides a low-impact workout that’s suitable for individuals of all fitness levels, from beginners to advanced athletes.
Benefits:
-
Low-Impact Cardio: The cross trainer provides an effective cardiovascular workout without the harsh impact on your joints, making it ideal for individuals with joint concerns or those recovering from injuries.
-
Full-Body Workout: By using both the arms and legs, you engage multiple muscle groups, including the glutes, quadriceps, hamstrings, chest, back, and arms, promoting overall body strength and endurance.
-
Calorie Burning: This machine is excellent for burning calories, aiding in weight loss and fat reduction when combined with a balanced diet.
-
Customizable Intensity: With adjustable resistance levels, you can tailor your workout to your fitness goals, whether you're looking to build strength or improve cardiovascular endurance.
How to Use the Cross Trainer:
-
Setting Up: Start by adjusting the machine to your preferred height and stride length. Ensure that the handles are at a comfortable level for your reach.
-
Starting Position: Stand on the pedals with your feet shoulder-width apart. Grip the handles firmly, keeping your elbows slightly bent.
-
Warm-Up: Begin with a 5-minute warm-up at a low resistance to gradually increase your heart rate.
-
Workout: Increase the resistance and incline as needed, maintaining a steady pace. Alternate between using the handles and focusing on your leg movement to engage your upper and lower body effectively.
-
Cool Down: Gradually decrease the intensity over the last few minutes of your workout to cool down.
Tips for an Effective Cross Trainer:
-
Maintain good posture by keeping your back straight and shoulders relaxed throughout your workout.
-
Focus on a smooth and controlled motion rather than a fast pace to maximize benefits and minimize the risk of injury.
-
Incorporate interval training by alternating between high and low resistance for an efficient fat-burning workout.

Overview:
Walking Lunges into your workout routine for a dynamic lower-body exercise that enhances strength, flexibility, and balance. This compound movement primarily targets the quadriceps, hamstrings, glutes, and calves while also engaging the core for stability.
Benefits:
-
Muscle Engagement: This exercise effectively targets the major muscle groups in the legs and glutes, promoting muscle growth and endurance.
-
Improved Balance and Coordination: The dynamic nature of walking lunges helps improve overall stability and coordination, enhancing functional movement patterns.
-
Core Activation: Walking lunges require core engagement for balance, contributing to improved core strength over time.
-
Flexibility: As you perform the lunge, you also stretch the hip flexors, promoting greater flexibility and range of motion.
How to Perform Walking Lunges:
-
Starting Position: Stand tall with your feet hip-width apart, shoulders relaxed, and core engaged.
-
Step Forward: Take a large step forward with your right foot, ensuring your knee stays directly above your ankle.
-
Lower Your Body: As you step forward, lower your hips until both knees are bent at approximately 90 degrees. Your back knee should hover just above the ground.
-
Return to Standing: Push through your front heel to rise back up, bringing your back foot forward to return to the starting position.
-
Repeat: Alternate legs by stepping forward with your left foot and repeating the movement.
-
Repetitions: Aim for 3-4 sets of 10-15 lunges on each leg, depending on your fitness level.
Tips for an Effective Walking Lunges:
-
Keep your torso upright throughout the movement, avoiding leaning forward.
-
Ensure your front knee does not extend beyond your toes to prevent injury.
-
Maintain a controlled pace to focus on form and balance.